99jolegg wrote:
UPDATE - 19 Mar 08 - Original post updated, to include clarification on certain parts, to add some common questions and answers to those questions and clarification about the GPS approach.
Approaches
- Instrument Landing System (ILS) Guides:
1) If you have filed an IFR flight plan, you will receive mandatory instructions at around 70 miles from your destination airport. Follow these instructions.
...and a clearance from around 25 miles
Follow instructions carefully - try writing them down if you think you'll forget. Write down the airport dictated in that clearance (if you don't already know it) and the runway and type of approach, i.e. ILS (type of instrument approach) 9L (the runway).
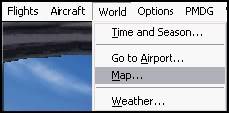
2) You then need to go to your Map which is the little star like icon on the panel or go to the "World" menu at the top and click "Map".
Or
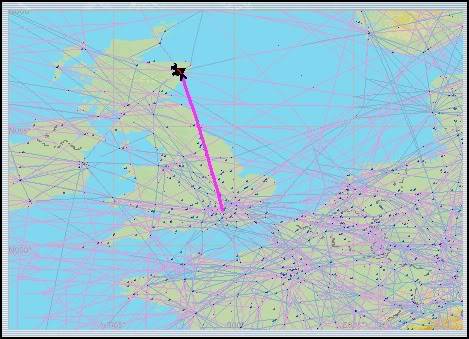
You should see a purple line towards your destination airport from where you are:
...follow this line to your airport, and double click on a runway at that airport in the map, (Note, you might need to do this more than once, as sometimes it thinks you're trying to change the route).
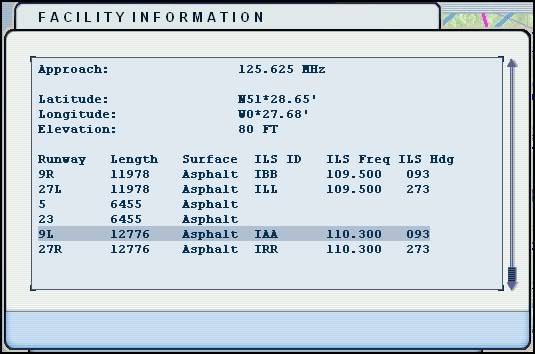
3) From the map, there should be a list of runways with a line of information after them. Find the runway that you received in your clearance in Point 1. Write down the ILS heading i.e. 093 degrees, and the ILS frequency of that runway (110.30), as well as the Airport Elevation (80ft) which can be found in that same box above the list of runways.
ILS information:
Elevation:
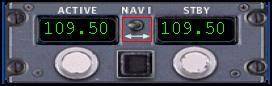
4) After you have all of that information written down, close the map and open your Radio Stack....
Key in the frequency you wrote down using the inner and outer knob, into NAV1 and make sure it is in the primary position, meaning it is on the left as opposed to the right of the two displays. This can be done by pressing the <---> button in the middle of the two screens.
At the bottom of the radio stack, there should be a row of clickable buttons, namely COM1, COM2, BOTH, NAV1, NAV2, MKR, ADF, DME etc. Click the NAV1 button as to illuminate the light. This enables you to hear the morse code frequency to check you have the correct frequency...
Note: MKR, DME and ADF are not essential for an ILS approach.
5) Close the radio stack, and enter the runway heading you wrote down from the map, into the Autopilot panel (MCP), under the CRS section (Course). This will serve to position the ILS raw data display in line with the runway, as you can see in the two diagrams at Point 12.
**In some aircraft such as the 747, the CRS selector is found on the Horizontal Situation Indicator (HSI) which is the compass on the panel, usually found under the Attitude Indicator.**
---You now have the approach set up, and should be flying towards your airport whilst descending. At about 30nm out, you should be around 9000 feet, descending at around 1500-1800 fpm with a speed of roughly 240 KIAS; aiming to reach 2800 feet by 15nm from the airport---
6) Once you reach the height and distance of 2800 feet AGL from 15nm out, you will now be hearing the ILS Morse code identifier and you should be roughly on course, according to the HSI (but only if you have remembered to type the ILS heading into the course selector). If you already have the GPS / NAV switch on NAV, you will soon see the glideslope becoming active - the point at which the bug / indicator starts to move from its bottom most position. You will need to be at a speed of 180 KIAS or less at this point.
7) At this point, or around 10nm out, at the same altitude, you should receive a clearance to land from ATC.
**************From here, you have two options:
- For Autopilot to control the descent on the ILS = Go to point 8
- To hand fly visually on the ILS = Go to point 12
--> For Autopilot to track the ILS...
😎 Switch the GPS / NAV switch to NAV instead of GPS.
9) Make sure you have Autopilot on, your speed is at or below 180 KIAS, and you are at a height of 2800 feet or less. Press the APP button at around 10 nm out, and the aircraft will follow its path down vertically and laterally until you get to 500 feet AGL. Note that you don't need to disengage the altitude hold button if you have it engaged - the AP will do that for you when you engage the APP button.
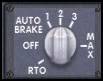
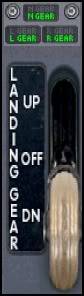
10) You will have to control flaps, auto brakes, speed and gear on this approach. At 500 feet AGL, you must disengage the Autopilot and hand fly the last 500 feet.
11) Once you land, slow down and taxi from the runway.
--> For manual approach on the ILS...
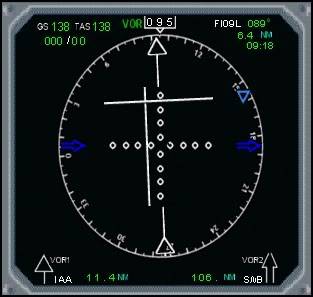
12) On the attitude indicator on the right and bottom side or similarly on the HSI, white indicator lines shall appear, with a pink triangle on both the vertical and horizontal set of lines. The big line in the middle is the centre of the approach and is the correct glide slope.
If you are too high, the triangle on the vertical axis will be below the middle line and vice versa. If you are too far to the left, the line will appear to the right of the middle bigger line, indicating that you should turn to the right until it centres.
To put it simply, fly towards the lines as to centre them. Other visual forms of interpeting raw data that the ILS provides exists. for example, two moveable bugs on a horizontal and vertical axis. The method remains the same - fly towards the lines, just as you do the triangles:
In the above hand-flown example, I am slightly low and slightly too far to the right i.e. I need to maintain altitude for a few seconds and add some left aileron and rudder. It takes practice, but becomes easier after that practice. The result...
13) Do this all the way down to the runway threshold; making small movements on the control surfaces to centre the arrows / lines on the HSI or attitude indicator. You can use the autothrottle (A/THR) to control the speed if you find this easier. At the same time, you need to control flaps and gear etc.
Common Questions...
1) Why do I have to intercept the glideslope from below?
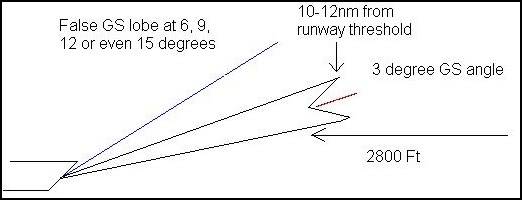
As you can see, the beam of the ILS extends to around 10-12nm. When the aircraft flies towards the runway, they are about to intercept the glideslope beam causing the vertical indicator to show the aircraft is on the correct descent gradient. From this point, the aircraft needs to start descending; below 2800 feet to stay in the centre of the 2 lines, which get closer and closer together until the threshold of the runway.
If you were much higher than this point, you can see that you'd miss the beginning of the GS and possibly encounter False GS Lobes which will provide misleading information.
2) Why when I engage the APP does the aircraft get a mind of its own?
In most cases, this is usually because you are engaging the approach hold button too early, or at too higher speed. You also need to make sure that you are near centered on both axes of the ILS before engaging the APP.
3) Why do I have to wait until the axes are centered before engaging APP?
Simple. The APP function of the autopilot is an approach hold feature. Therefore, it was only ever designed to hold an approach that the pilot has setup. It only follows that it won't do well in trying to track both the localiser and GS from scratch.
4) Can I perform an autoland using the ILS?
No. No default aircraft in FS9 or FSX is capable of landing automatically. The APP is only an approach hold function and must be disengaged along with the A/THR at Decision Height or above. Decision Height is the height above ground level, specified in the approach plate for that runway, that you must commence a go around if you don't have visual contact with the airfield and runway.
5) Why am I having trouble trying to centre the axes?
There is no simple solution to this. Practice in a smaller aircraft first. The example above is using a Boeing 737. Try out an ILS approach in a Cessna to get a feel for how much movement you'll need to stay centered on the approach.
6) Why do I end up 'missing' or 'over-shooting' the glideslope and localiser?
This is most probably down to poor handling of the aircraft or due to flying at too higher speed. Make small movements on the control surfaces and I suggest clearing the weather so you can see the airfield at all times. This will help you gauge how much you'll need to compensate with regards to control surfaces.
7) What is that damn annoying beeping noise when I approach the runway?
It's the morse code identifier for the NAV aid's frequency that you have tuned in NAV1. Cross-checking the morse code you hear with the morse code on the map / chart will confirm you are tracking the desired NAV aid.
😎 Why do I need to turn the NAV/GPS switch to NAV?
The NAV and GPS settings relate to two different entities. Real world aircraft don't use the GPS like the sim does so this switch isn't in existence in the real world. Simply put, the GPS side of the switch simply slaves the autopilot to what is programmed into the GPS. The NAV side of the switch slaves the autopilot and instruments to any NAV aids you have the NAV radios tuned to.
9) At some airports, I've descended to 2800ft but am really close to the ground, or even worse, it is below the level of the ground. What's going on??
This is where the airport elevation part of Point 3 comes in. When descending to an airport of higher elevation than normal, you need to make sure you add the elevation of the airport to 2800ft to give you an interception altitude. In the example above, the airport is at an elevation of 80ft, making little to no difference. However, airports like Denver, Colorado have an elevation of 5000ft - descending to 2800ft AMSL, will leave you 2200ft underground - not a good position. Therefore, adding the airport elevation to 2800ft will make 7800ft, leaving you 2800ft above ground level.
- VHF Omni directional Range (VOR) Approach Guides
Alternatively...
http://www.navfltsm.addr.com/vor-appr.htm
- Non-Directional Beacon NDB (Automatic Direction Finder) ADF Approach Guides
Read through the link below...
http://stoenworks.com/Tutorials/IFR,%20NDB%20%28ADF%29%20Approaches.html
Alternatively...
http://www.navfltsm.addr.com/ndb-appr.htm
- Global Positioning Satellite (GPS) Approach Guide
The GPS approach will allow you to fly towards an airport or runway using the autopilot with NAV engaged and the NAV/GPS switch set to GPS. The tracking is only lateral so descent will have to be controlled by the pilot. Again, autopilot should be disconnected by 200ft AGL.
1) Open up the GPS.
2) Click the button on the right hand side at the top with "--->" on.
3) Click the right arrow on the inner knob on the bottom right hand side of the GPS once and enter the 4 digit ICAO code for the airport. For example, London Heathrow = EGLL.
4) Click "ENT" on the right hand side and then use the right arrow on the outer knob until the cursor reaches "Activate" and then click "ENT" again.
5) Now click "PROC" at the bottom of the GPS.
6) Click "ENT" when the cursor is over "Select Approach". Choose the approach you would like by moving the cursor by clicking the left or right arrow on the outer knob. For example, ILS 29L.
7) Click "ENT" and pick the waypoint from which you would like the approach to your selected runway to start from. If you would like it to start in a straight line from the runway about 15nm's out, select Vectors (Recommended).
😎 Click "ENT". Click on the right outer arrow so cursor is on "Activate" and click "ENT".
9) Your flight plan will then appear. Click "PROC" twice and the approach will be set up.

 Trainee
 14 Answers
 Jump to latest

 First Officer


 Chief Captain


 Captain


