Hey everyone,
Every one of us at flyaway is here for a reason - either an addiction of flight sim or aviation (such as me), or simply for the aviation hobby. Whatever it is, most of us would love to be able to fly an aeroplane in real life, whether it be as a career or simply a recreational activity. Which brings me to the point of my topic - an insight into making a Kiwi (or NZ'er) fly. From 0 hours to first solo.
A bit about me
As you can tell from my flyaway username, my name is Jarred and I come from Hamilton, New Zealand. I attend Hamilton Boys High School and am currently in the 5th form, otherwise known as Year 11, and I am 15 years old. As for my interests, aviation, aviation, and er... aviation! 😉 I do have other interests, by the way. 😉
You have now learnt that I am just your average Joe Blogg.
The airport
Each lesson I have will be at the Waikato Aero Club, located at Hamilton International Airport, in the North Island. The ICAO codes are HLZ / NZHN. Hamilton has 4 runways in total, (although some are new and are not currently on FS), 3 being grass (25L / 07R, 25R / 07R, 18R / 36L), and one seal runway (18L, 36R). Most of the time we will be using the grass runways, so we don't get in the way of commercial traffic too much.
At the conclusion of each lesson, I will post a report on flyaway about the lesson, progress made, etc.
Hopefully you'll enjoy it!
Well that's enough talking, so I'll post my first lesson report tonight (Effects of Controls 1).
Thanks for reading,
Jarred. 😀
I for one will follow this with interest. I hope it all lives up to and exceeds your expectations.
Good luck!
I hope you enjoy yourself mate, and I look foward to reading the posts.
Are these reports from the lessons you took during the last summer holidays or have you started doing some new ones now?
What age do they allow you to solo down in New Zealand? Is it the same as the US? (16 solo, 17ppl)
matt7723 wrote:
What age do they allow you to solo down in New Zealand? Is it the same as the US? (16 solo, 17ppl)
Yep, we have the same ages as the US. My birthday is in September, so if I have a lesson once a fortnight, I should be able to solo round that time.
CT - I'll write up reports for the previous lessons I have had (now 5) and continue from then on, hopefully having a lesson once a fortnight.
Hey everyone,
Well another day has passed down here in Kiwiland so what better thing to do than some lesson reports? Well lets get started then!
Lesson One: Effects of Controls (1)
As Thursday 29th December began, it dawned on me that I would finally be having my first flying lesson at the Waikato Aero Club - after six cancellations, I was roaring to go so I gathered up all my flying gear and headed for the local airport (NZHN), a 20 minute drive from my house. My instructor for the day would be Greg, who I knew from a trial flight a year or so ago, with our lives being in the hands of a Cessna A152, the rego being ZK-EJZ.
Echo Juliet Zulu was late coming back so I made myself comfortable in the low - rider chairs with one of those water cooling machines beside me, dad seemed to be making good use of the tea and coffee machine.
After the long wait (someone was in the briefing room) Greg took me into the briefing room and talked me through the theory part of the lesson. It was pretty straight forward, we were pretty much just learning what the controls of the plane such as the ailerons, rudder, elevator, how lift keeps the plane in the air, the basic controls of the cockpit, and the 'Im Safe' checklist (a mnenomic, spelling?) Once that half was over with, we moved onto the a couple of main effects: airspeed, and slipstream, which would make up the basis of the lesson.
We then went out of the briefing room, collected our headsets, flight paper, etc, and headed for EJZ. Thankfully our trusty 1980's model A152 passed our pre - flight inspection, the only minor problem being slight fuel contamination in the nosewheel drain hole, but that cleared itself up after we tested a second time.
We then climbed into the aircraft with Greg giving me a lesson on how to belt yourself into a aerobat harness (it's a little harder then it looks), before getting me to write down the time on the Hobb's meter (it measures decimal time) and checking all the airworthness certificates, flight manuals, axe, fire extinguisher, etc were on board. We then started EJZ up and cranked her up to a 1000 RPM, they dont idle very well when they are cold, it also allows your T's and P's to rise into the green range faster, causing less damage in the long run) and checking that nobody had crashed by checking the ELB frequency of 121.5, which no one had. Greg then tuned into the ATIS on 128.6 and wrote down the important information. He then told me I could establish contact with the tower on 122.9 if I wanted, so I said "Hamilton Tower, Echo Juliet Zulu" and waited for ATC's reply back.
I got to taxi EJZ out to grass 25 for a west departure, and soon we were full throttle down the runway, a couple of minutes later we arrived at cruise altitude of 1500 ft and we levelled off.
My first exercise of the day was the effect on the controls at different airspeeds, so Greg first set a S & L attitude with 2000 RPM and allowed the airspeed to settle at 90 knots. I then had a bit of a fiddle with the elevator, rudder, and ailerons to feel the firmness of them, which was quite a bit stiffer then I thought they would be. Keeping the same power setting we pitched up until the needle was at 60 knots on the AI - we then did the same thing, taking notice how the controls dont have as much feel at slower airspeeds, as there is less air flowing over them.
Second exercise was the effect of slipstream, where airspeed was maintained but power settings were varied - with the elevator and rudder becoming more effective due to slipstream from the engines - differing from the 'different airspeeds' exercise above where there was a constant airflow over all parts of the plane rather then just the elevator and rudder. (Sorry I dont really no how to explain that, I hope you get me) 😉
Once that was over with it was time to head back to the airport for landing, so Greg let me have a go at the approach with help from him, before touching down at the stall warning on grass 25, where we took off from.
Overall it was an interesting lesson, with time to enjoy the scenery as it wasn't exactly the most stressful of lessons.
I then taxied EJZ back to the club before shutting it down, ready for someone elses flying lesson.
Well thats EOC1 report, I hope that it wasn't to boring as it was way to long, I'll make sure its shorter next time.
Flying Time: 0.5 hours
Total flying time: 0.5 hours
Cool! Was your dad in the aircraft or does he have to stay on the ground.
Did knowing what you know from FS9 help you understand the flight instructor better or is it no help at all.
Thanks for the very detailed report Jarred, it was very intesting to read and so well written.
I look foward to the rest of your reports that I be sure to read as soon as you post them!
BTW- Is Hamilton Aero Club the same place Easyjet pilots train?
Cheers
Very interesting report, Jarred! I enjoyed reading it. 😉
RadarMan wrote:
Cool! Was your dad in the aircraft or does he have to stay on the ground.
Did knowing what you know from FS9 help you understand the flight instructor better or is it no help at all.
Nope, no room for a third person in a 152. 😉 I could train in a 172 so I could take up two extra people, but its more money that has to be forked out! 🙄
As for flight sim, it teaches you about the plane itself, rather then how to fly it. For example, my knowledge of FS meant that I knew what all the instruments do, how the plane flies and the basic controls. But then when it comes to flying the plane itself, that's a completely different story. The sensation of flight makes it slightly harder but much more interesting, unlike a Cessna on FS, if you pull the controls back hard in real life, you may as well say goodbye to your lunch! A really annoying thing that FS teaches you to do (incorrectly) is looking at you instruments much more than you should, as in a real plane you should spend 90% of your time looking outside, and 10% checking your instruments. Some things are also reversed, such as when climbing and descending you judge your rate of descent by your airspeed, rather than the VSI or AH/AI, which can be a pain as you have to anticipate what attitude to pitch the plane and then wait for the airspeed to settle down.
CT - No, the easyJet trainees attend CTC Aviation, a couple of hundred meters down the road from the Waikato Aero Club.
Last but not least, glad to hear that you enjoyed my report guys, thanks for your replies. 👍
Morning, afternoon, evening all!
Effects of Controls 2
My second lesson of my training began the day following my first lesson, with a start time of 8.00am local time. Lesson 2 was taken this time by Loreen, a newer 'C' category instructor who works part time at the aero club. As it was the first flight of the day we started early and got cracking in the briefing room.
First of all we summed up what I learnt in the previous lesson, and checked if I had any questions, which I didn't. Following the conclusion of that, we went through the effects of power changes, e.g. with reduced power the nose yaws to the right and the plane pitches down, while with increased power the plane yaws to the left and the nose pitches up. The reason for this is because the backwards thrust from the prop creates a large thrust of air which is blown towards the tail in a corkscrew like manner. As the prop is only rotating in one direction, it causes yaw to one side - simple enough! Following that part we moved onto the anicillary controls, which happen to be the flaps and trim, which were simple to understand as well.
Which brings me to the best part of a lesson, the flying itself! Once again we climbed to 1500 ft, this time heading to the East instead of the West and I had a fiddle round with the throttle to notice how the plane reacts to power changes, which was quite a bit more than I thought it would be (another FS fault). 😉 Next part of the lesson was the flaps, in which I had to slow the plane down into the white flap area part of the speed indicator, so the flaps could be deployed. Lowering flap raises the nose of the aircraft, while retracting does the opposite and lowers the nose. Once that was over with Loreen taught me how to trim the aircraft, it's a great feeling when both you and the instructor can take your hands off the controls and the plane virtually flies itself, much easier then holding the yoke back or forward all the time!
We then turned and headed back towards the airport, where ATC told us we would have to join the circuit before landing, before turning onto finals for the apporach. This time I think it was for grass 18R, slightly longer than the other grass runways.
Well that sums up yet another flying lesson, with another entry into the logbook. Tomorrow night I will type up the Straight and level report.
Flying time: 0.5 hours
Total flying time: 1.0 hours
Thanks for reading,
Jarred.
Great write up Jarred! One site that I have found really helpful with all my real world related questions is www.studentpilot.com. Its a message board similar to this with thousands of real world pilots. Its great for asking any questions you have and learning plenty of new things also.
Another great read j1- thanks 😂 Keep them coming!
Hey everone,
Lesson number 3 tonight, which happens to be Straight and Level, turned up to be a relatively simple and straight forward lesson, which helps when you're just starting out! S & L was taken on, with Loreen as my instructor again and a medium strength wind.
Once again we headed into the briefing room and went over the objective, which is a follows:
To fly the aircraft straight and level IE. At a constant height (+-100ft), a constant heading (+-5 degrees), a constant airspeed (+-10 kts) and in balance. Also to develop a scan technique and awareness of the pilots visual limitations.
We started off with the forces acting on an aircraft in flight, which are lift, thrust, weight, and drag. When all four forces are equal, the plane is said to be in equilibriam (or straight and level). Loreen quickly went over the tailplane, which is used to balance out any residual pitching movements that may take place.
Following that part of the theory, I learnt about S & L at different airspeeds, where a 2 degree A/A (angle of attack) equals 110 kts, 4 degree A/A equals 95 kts, and 10 degrees A/A equates to 60 kts. Next we went onto aircraft management and human factors, such as blindspots, ATC, orientations, and VFR.
This time we took up ZK-FLB, a Cessna 152 that the aero club is currently leasing from another nearby club, which is slightly older but well looked after and cared for. Once we got to cruise altitude of appoximately 1500 ft in the Eastern training area, I learn how to attain S & L from the climb, and there is a useful mnemonic 'APT' which stands for attitude power and trim, so you carry out those tasks in that order. Generally attitude and power can be carries out in relatively short sucession, however trim has to be done a little later on once the planes attitude and airspeed has settled down.
My next exercise was maintaining S & L flight, which is obviously simple except when a large gust of wind came and kicked the tail out to the side, meaning you would have to correct it. Following that was attaining S & L from the descent, which used the same 'APT' mneumonic of attitude, power, and trim.
Last of all was regaining altitude, so if you want a small altitude change of 100 ft or less, no extra power is required as you just put in more elevator, while changes more than 100 ft require more or less thottle.
Make sense? Good. 😉
Flying time: 0.6 hours
Total flying time 1.6 hours
Next lesson will be climbing, which should be typed up by tomorrow night. [/b]
Very interesting Jarred! I'm looking forward to read the next lesson report 😉
Well it's time for another lesson report guys, thanks for all your replies and for matt7723, thanks for the link, it looks very interesting. 👍
Lesson number 4 for me would be Climbing, with the objective as follows:
To initiate a climb from S & L flight, achieving a steady increase in height, at a constant airspeed, (80 kts +- 10 kts) maintaining a constant heading (+- 10 degrees) and keeping the aircraft in balance.
My instructor for this lesson was Dave, a relatively new and young instructor who had been brought in for the extra workload the club was currently being put on, with aircraft being booked up 3 weeks in advance, luckily its only down to 7-14 days, depending on a weekday or weekend.
From now on I'll try and concentrate more on the flying part of the lesson than the theory part, but lets start with the theory and get it over and done with.
First of all Dave taught me about the factors affecting the climb, which are climb performance, power, weight, altitude, and flap, with some only making minor changes, others making quite large changes. We then went over the following saying:
"Normally when considering climbing we think of the aircraft as being in a state of equlibrium with thrust together with lift being equal to weight and drag but with the weight being more than equal to the lift".
We then went onto aircraft management and human factors again, which I quickly went over in the previous lessons, and then moved onto climb speeds. There are 3 main speeds used during the climb:
Vx = The best angle of climb which occurs 54 kts
Vy = The best rate of climb which occurs at 67 kts
** = The cruise climb which occurs at 80 kts
We went up in a different Cessna 152 this time, ZK-EOQ, and taxied out to grass 36L for departure to the East for climbing practice. Once we were established in the climb out of Hamilton, Dave gave me the controls and I climbed up to 1500 ft or so, and exited Hamiltons control zone.
Dave demonstrated a perfect climb to about 2000 ft and then I had a go, using the P.A.T. mnemonic from the previous lesson and climbed up to 2300 ft. Since there is a Class C control zone beginning at 2500 ft, we stopped there and descended back down to 1500 ft. We then completed a few more climbs, at the same time Dave was pointing out how to maintain the climb, such as using ailerons, rudder, and the elevators, as well as your scan, e.g. lookout (outside) followed by attitude, and then checking your instruments which wasnt too difficult.
Once you have completed the climb, you return to S & L flight by using the following mnemonic, A.P.T. Basically that means lowering the nose with elevator to your desired attitude, then reducing power back down to 2300 RPM, and finally trimming the aircraft to relieve any undesired control pressures that may be present.
Last but not least we went over the effect of flap, which is mentioned in the following statement:
"With flap lowered you should note; that for a given airspeed - the nose position is lower than when clean and that the rate of climb and the angle of attack are reduced".
So that brings to the end of my 4th lesson - climbing, this time with 0.7 hours in the logbook. Tomorrow night I'll cover descending, and by the end of that I will have caught up in time to the lesson I'm having next Saturday, which is medium turns.
Flying time: 0.7 hours
Total flying time: 2.3 hours
This is getting more interesting! Thanks Jarred! 😉
Jarred,
Is it common for lessons to be that short at your flightschool? I was doing 2 hour lessons once a week with probably 30 minutes spent on the ground discussing what we would be doing in the air. You are flying almost everyday though so that probably explains the length.
Still very interesting to read 👍
Looking foward to the next one
matt7723 wrote:
Jarred,
Is it common for lessons to be that short at your flightschool? I was doing 2 hour lessons once a week with probably 30 minutes spent on the ground discussing what we would be doing in the air. You are flying almost everyday though so that probably explains the length.
Yes, they must be quite a bit shorter in NZ then in the US, I'm assuming that's where you're from. We generally spend about 30-45 minutes doing theory, and 30-45 minutes in the air, I don't really know why they're so short, as you learn to do that exercise and then have to wait another week where you go over it again. 🙄
BTW, I've actually been having these lessons over the past couple of months, it's just that I thought I would catch up to the lesson I'll be having soon. Generally I only have a lesson every fortnight, as it's too expensive otherwise.
Hey guys,
Tonight will be the last lesson report until Saturday, where I will be learning medium turns, but tonight I'll be going through descending. As per usual we'll start off in the briefing room, with Dave as my instructor again. 😉
Lesson Objective:
To initiate a descent from S & L flight, achieving a steady decrease in height, at a constant airspeed (+- 10 kts) maintaining a constant heading (+-10 degrees) and keeping the aircraft in balance.
First of all we learnt about the principles and considerations of the descent, which are as follows:
➡ A glide descent, where no engine power is used to control the rate of descent.
➡ A powered or cruise descent, where engine power is used to control the rate of descent.
Next we went onto the factors affecting the glide descent, which are as follows:
➡ The lift to drag ratio, which is approximately 10:1 in a C-152, meaning that for every 1000 ft of altitude lost, the plane will glide 10,000 ft (1.7 nm).
➡ The A/A to achieve the best lift to drag ratio is 4 degrees, which equates to 65 knots in the 152.
➡ A headwind will reduce the aircrafts distance travelled across the ground, while a tailwind will decrease it.
➡ The effect of weight, meaning that while the aircraft will still travel the same distance overall, it will descend at a faster rate.
➡ Effect of flaps, where any degree of flap will increase drag, therefore reducing the distance that the aircraft will travel across the ground, as well as a steeper glide angle and an increased rate of descent.
Thirdly we went onto the cruise descent, which is more practical for normal circumstances as the rate of descent is controlled by power, while airspeed is maintained with nose attitude. It has several other advantages:
➡ Less chance of spark plug fowling and carburetor ice forming
➡ The feel of the controls are more positive due to the increased slipstream, therfore allowing more control of the descent
➡ It saves time because airspeed is maintained.
Finally to end the theory we went over aircraft management and human factors again. Right, now for the fun bit!
As I had already done 4 pre-flight inspections before, Dave asked if I would like to do the pre-flight by myself while he waited back in the clubrooms. I was most impressed when EJZ carried out my command of fully lowering the flaps, good girl! Once all that was over with, I went back to the clubrooms and told Dave that EJZ was safe to fly and he double checked our fuel level for safety.
On our engine run up we suffered a minor problem with our right magnetos which was very rough running, but that problem was soon corrected by increasing power to 2000 RPM and we leaned out the fuel so the engine ran at maximum temperature for half a minute or so, which magically cleared the engine. I was the only person with my feet on the brakes so I made sure my feet didn't slip off them because we would soon be accelerating down the taxiway (cruise power during flight is just 300 RPM more)!
This lesson Dave let me take off by myself which was awesome, I just need to pull back on the yoke a bit faster, other then that it was pretty good. (better than pulling back too fast, = tail strike )
Soon we were in the air and we headed out to the Western training area to practice descending. Like the other lessons Dave showed me how to do a descent, and then I had a go at it, using the P.A.T. mneumonic yet again, and we practiced both glide and cruise descents for the rest of the lesson. There isn't really a lot you can talk about climbing and descending, as it's pretty self explanatory.
Highlight of the lesson? Getting to take off by myself, of course!
Most interesting part? Having a rough running magnetos, and then fixing it!
Flying time: 0.5 hours
Total flying time: 2.8 hours
Next lesson isn't until Saturday morning, so I'll catch you all then. 😉
I'm sure you had lots of fun during this lesson.
Hey everyone,
As you may have noticed I've been pretty lazy lately and haven't been bothered typing up my latest lesson report, but here it is anyway. My lesson was in ZK - EOQ, a C-152 with approx 17,000 hrs on its airframe (no, that is not a typo), Greg was my instructor for the lesson, and it was 'Medium Turns'. Here is the lessons objective:
To change the aircraft's flight path at a constant 30 degree angle of bank (+- 10 degrees) at a constant height (+- 100 ft).
This time I'll simply list what I learnt in the theory, and try to focus more on the practical side. Here are the main points:
➡ Lift, drag, and overbanking
➡ Adverse yaw as a result of aileron drag
➡ Nose attitude
➡ Aircraft management
➡ Human factors
Unfortunately I cant remember the ATIS, but it was around 15 knot winds at 2000 ft or so. Unusually EOQ had full tanks so there was no need to fuel up following the pre-flight inspection, so we took off and headed out to the Western training area as per usual. This time the instructor did the take off but I got fly us up to 1500-2000 ft after the wheels left the ground. Once we were clear of Hamilton's control zone we picked out an easy to find landmark, which happened to be Mt Pirongia, sticking some 3000 ft into the sky as our reference point.
Greg then demonstrated a turn to the left, which is done by doing the following: Select a reference point (Mt. Pirongia), trim the aircraft to S& L flight, complete a lookout for other aircraft, and lift the wing slightly above the horizon in the direction you are turning into, this makes sure that no aircraft are hiding behind the wing. E.g. if you are turning left, raise the left wing a little. Following that, roll into the turn with the ailerons and at the same time use a little left rudder and some upwards elevator pressure to keep us at a constant height. Once you are established in the turn, however, no rudder was needed as the aircraft was behaving itself by staying in balance.
Judging the turn can be harder than it looks when you cant use the instruments, thankfully there are some bolts on the engine cowling which you can line up with the horizon to keep roughly a correct angle of bank. EOQ needed quite a bit more backpressure on the yoke then I first anticpated, but after a few 360 degree turns I finally began to get the hang of it.
Following the left hand turns, we moved onto right turns which are even harder because the bolts that you would use to line up a left turn now droop below the horizon, as the pilot is sitting up higher due to the bank angle. This was a pain but like the left turns I got used to it after a while, before we finished off the lesson with a left and then right turn before heading back to Hamilton for landing.
Normally at Hamilton we land on one of the grass runways, and this time we happened to land in a pothole or something because we bounced back up again after making contact with the runway initially. I will add in here before someone complains we came down too fast - we made a perfect landing right on the stall warning and the instructor told me they needed to bulldoze that part of the runway - not our fault!
We taxied back to the clubhouse for shutdown and Greg got me to write down the time we flew on the Hobbs meter - I was pleased to see 0.7 hrs on it until I remembered it will cost me more money. 🙄
Well $123 NZD ($75 USD) down the drain but well worth it! 😉 Next lesson is Climbing and Descending turns which I will be doing in a couple of days.
Flying time: 0.7 hrs
Total flying time: 3.5 hrs
Thanks for reading,
Jarred. 😀
Morning / Afternoon / Evening,
Yesterday afternoon, being Saturday the 1st of April, I had my 7th flying lesson, which was Climbing and Descending Turns. This lesson turned out to be the best so far, as we ended up turning it into more of a scenic city flight mixed in the some 50 degree steep turns 🙄 But hey, I'm not complaining!
As per usual both the instructor and aircraft were late geting back, as my instructor Dave had been out on a long map reading flight. 45 minutes late in fact, so dad and me made good use of the water cooler, tea/coffee machine and drink machine. Anyway, here's the mission objective:
To change the aircraft's flightpath at a constant angle of bank, at a constant airspeed and in balance while climbing or descending. In the pre-flight briefing, we went over the following:
➡ What happens to the aircraft (e.g. forces) in a climbing turn
➡ What happens to the aircraft (e.g. forces) in a descending turn
➡ Aircraft management
➡ Human Factors (e.g. lookout, orientation, etc)
➡ Air exercise (what we were going to do in the lesson)
Following the briefing I went out and did ZK EJZ's pre-flight inspection with everything looking in good condition (even full tanks of gas)! As usual I got to taxi EJZ out to the holding point and complete the engine run up, before lining up for the first time on the 2000m ashphalt runway which was a first for me. Dave said that I was going to both take off and land this lesson which I was looking forward too, and we decided to fly over the city rather than the countryside for a change of scenery.
After being cleared for take off I advanced the throttle to full power but didn't quite use enough right rudder to keep the aircraft on the centre line, but all too soon we were at rotate speed so I pulled back on the yoke and launched us into the air the climb to 1500. Once we were at cruise altitude we levelled off and Dave showed me a climbing turn, which I then followed through after him.
At first you want to put the aircraft into an 80 knot climb, and then using the ailerons and rudder roll the aircraft into a 20 degree bank, using a little backpressure to maintain the correct attitude. I completed a couple of those before moving onto the descending turn.
Once that was completed we turned back round to head back to the airport, but with a detour over Waikato Stadium, my local rugby ground where a Super 14 match was getting ready for kick off. Dave did a 360 degree medium turn over the stadium which was pretty cool, then he did a 50 degree steep turn which was probably one of the best things I have ever done. The rate of turn is amazing, you do a 360 extremely fast, and we could pretty much stay straight above the stadium without going round the outside of it! Steep turns give some pretty awesome G-forces, it basically pulls on your stomach but nothing too nasty. 😉 A picture of the stadium can be found at the following Wikipedia link:
http://en.wikipedia.org/wiki/Image:Hlz_stadium.jpg
Once the excitement of the steep turns were over with, we headed back to HLZ for my first complete landing, which I would have my first go at. Dave manned the throttle, while I had the yoke and pedals to play round with. I had a go at rolling out of the turn onto finals while I didn't anticipate very well, so I had to head left for a bit to get back on track. Once we were heading straight for the runway I lined up properly for the approach. Dave then told me when to fly level with the runway which I did without difficulty, but when it was time for landing I didn't quite pull back quick enough on the yoke and we only just landed on the main wheels. 😕 Oh well, better luck next time.
I was pretty 'pumped up' from the steep turns when we got out of the aircraft so dad had to listen to be rave on about how awesome the turns were... 😂
Well another 0.5 hours for the logbook, next lesson is Stalls, I think I'm with the Chief Flying Instructor, Roger.
Flying time: 0.5 hours
Total flying time: 4.0 hrs
Thanks for reading,
Jarred. 😉
That must be awesome! 👍
Agus0404 wrote:
That must be awesome! 👍
Affirm Captain!
Hi everyone,
Today would have to have been my best lesson so far, not only because it was basic stalls, but we also did some aerobatics as well! Here is the lessons objective:
To recognise the symptoms of the approaching stall - to experience the effects on the aircraft at the stall itself - and to recover correctly from the stall with a minimum height loss. Like last lesson I'll simply list what I learnt in the theory and keep the majority of the write up practical, which is of course the best part.
Factors affecting the stall:
➡ Weight
➡ Icing / Damage
➡ Loading
➡ Power
➡ Flat slats / slots
Aircraft management and human factors:
➡ Pre-stalling checks (H.A.S.E.L.L.
➡ Intermediate checks (H.E.L.L.)
➡ Situational awareness
➡ Orientation
Air exercise:
➡ Entry
➡ Symptoms
➡ At the stall
➡ Recovery
➡ Instructor Demonstration
Right, now we can start the most exciting bit, the flying itself. As per usual I went out by myself and completed the pre-flight inspection, and everything looked up to scratch so I went back into the clubroom and grabbed my instructor for the day, Roger, who is the Chief Flying Instructor. This time my takeoff was better as I kept us straighter once we became airborne. We headed out to the West for training again, and I climbed us up to 2500 ft.
Roger than gave me a few demonstrations of the stall before I had a go at it myself. The first few times I was a little apprehensive so I didn't recover quite as fast as I would have liked, but I began to get the hang of it after a while. I kept forgetting to turn the Carb heat off when we passed through 60 knots, but that wasn't too much of an issue once I got the hang of it. My last stall of the day was the best, but Murphys law made its presence known by telling us we would have to return to the airport or we would go over our 1 hour limit in case someone else needed the aircraft.
By then there was probably 0.7 on the Hobbs already, so we decided it was time to head back to HLZ for landing. Meanwhile, Roger asked if I wanted to do some aerobatics so I said 'may as well!' and away we went.
First of all we did a couple of barrel rolls, which was awesome fun, and I think we also two or three stall turns after that, followed by a loop the loop which was the best of the lot, as we stayed flying upside down for a couple of seconds before finishing off the loop. Aerobatics isn't as stomach churning as people make it out to be, the forces are less than a steep downslope on a roller coaster as you dont leave your stomach behind as such. The forces rather try to pull your mouth down, which would be amusing to watch in a video. The forces are what makes it so interesting and fun to do, because you sure do have that sensation that you're upside down.
Following the aerobatics, we headed back to the airport for landing. Once we joined the circuit (or pattern if you want to call it that) we had to complete a right hand orbit to allow the wake turbulence from the Air NZ ATR 72-500 to clear from the main runway. Roger then let me have a go at the landing, this time I stuffed up by over flared instead of under like the last landing and we ended up doing a bit of a 'floater' down grass 36. Oh well, practice makes perfect. 😉
Overall an awesome lesson, with getting the hang of stall recoverys and the aerobatics the highlight of the lesson. This time I got to put 0.9 hrs in the logbook, which brings my total to a respectable 4.9 overall. As it is now the school holidays I'm going to have three more lessons in the next fortnight, next up will be Power and flap stalls, which will be this Thursday (20th April), followed by Circuits.
Flight time: 0.9 hrs
Total flying time: 4.9 hrs
Until next time,
Thanks for reading. 😀
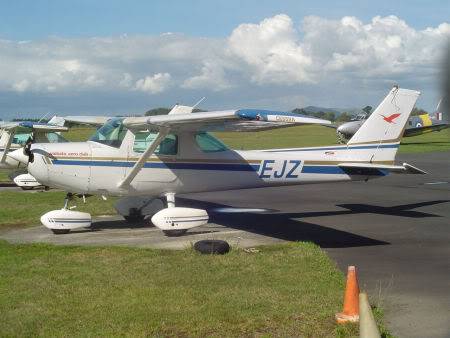
Just for interest sake, this is the aircraft that I do the majority of my training in, C-152 ZK-EJZ, however I also sometimes train in ZK-EOQ and occasionally ZK-FLB.
EJZ (pictured) was the plane I did my aerobatics in yesterday (see previous post), doesn't exactly look worthy of aerobatics, does it? A plane can be a similar to a book, therefore never judge aplane by its cover (or looks)! 😀
Unforunately no flying yesterday, as my local airport was completely fogged out, with visibility down to just 100m (330 ft), so it was 100% unflyable. I've rebooked the lesson next Wednesday as 8.00am, so you'll have to wait until then for the next report. 😉
Hi everyone,
Just got back from my 9th flying lesson, Power and flap stalls, with Dave as my instructor and ZK-EOQ as the aircraft. The objective of today’s lesson is as follows:
To observe the effect of power and flap on the stall, to recognise the syptoms of the approaching stall and to recover correctly from the stall with minimum height loss.
We then went over the following main points of the lesson, which are as follows:
The effect of power:
➡ Slipstream
➡ Vertical Component of thrust
The effect of flap:
➡ Lift
➡ Aircraft Management
➡ Human Factors
➡ Air Exercise
The weather for today was pretty calm, here's the ATIS report:
HAMILTON (NZHN):
METAR NZHN 252300Z 34008KT 30KM FEW035 18/13 Q1009=
TAF NZHN 252101Z 252112
05005KT 30KM -SHRA SCT025
BECMG 2301 28010KT
BECMG 0709 VRB02KT
2000FT WIND 32010KT =
This time it got to make the majority of the radio calls, including the second call of the day which includes quite a lot of information such as where you are heading, the ATIS version, and your QNH amongst a number of other things. Before I knew it we were thundering down grass 36L taking off, which didn’t quite turn out as well as I’d liked with the rotate being slightly slow. Air traffic for the region was reasonably busy for the time and day (8.30am, Wednesday) and we were forced to make a [I]Scott[/b] departure, consisting of an approach out at 1200 ft or below, and once established in the Scott departure area we could fly at 2500 ft or below, the limits of our Class D control zone.
Once established we climbed and levelled off at 2500 ft until we reached the control zone boundary, where we exited to do our stalls. First of all we went over the basic stall from the last lesson, and once and Dave and myself were happy with it we moved onto the power stall. Unlike the basic stall, we use 1500 RPM instead of full idle (about 600 RPM), meaning the nose attitude of the aircraft is higher than that of the basic stall. It also means that the entry to the stall takes longer as the aircraft must slow down considerably. The good thing about stalls is that once you get the hang of it initially, stalls after that become reasonably simple and rewarding to do. On my last powered stall of the day the left hand wing stalled before the right one, causing the aircraft to rapidly bank steeply to the left which gave us a bit of a fright. Unfortunately I can’t remember why this occurred, but I’m pretty sure it wasn’t my fault (possibly turbulence).
Following power stalls, we progressed onto the flap stall. This time 20 degrees of flap is selected, with the power being set at full idle. Because the flaps are generating a considerable of additional lift, the nose high attitude has no need to be has high, therefore we stall the aircraft at a nose up attitude only slightly above the horizon. These all went fairly well, so we moved onto the last exercise of the day, the power and flap stall. Once again the same recovery technique was used, of control column forward, full throttle and a little right rudder to prevent yaw. Once Dave and myself were happy with the 3 types of stalls we headed back to the airport, where we joined in a right base for grass 36, behind the Air New Zealand ATR 72-500 on finals for 36R. We had to slow down a little so we would join behind it, and not into it. My approach wasn’t too bad, slightly off to the right, not made easy by the turbulence (I guess it was wake turbulence from that damn ATR :wink🙂 before touching down on the grass to end another lesson.
This lesson turned out to be quite a long one, with 0.9 hrs in the logbook, and another $160 NZD down the gurgler, but well worth it! I worked out that I have now spent over one grand in lessons so far, a total of $1008 NZD ($630 USD). Next lesson will be introduction to circuits (patterns) on Monday the 1 May.
Flying time: 0.9 hrs
Total flying time 5.8 hrs
Thanks for reading,
Jarred.
Hey everyone,
Last Saturday was lesson number 10, and we were doing 'Circuit Introduction', which turned out to be complete mayhem. I can't be bothered writing put about the theory any more to be honest, and anway the flying itself is what you're reading this for!
Riteo, lets get started. This afternoon I was back with Greg, who I've had a couple of times before. The pre-flight briefing was quite long, as there was about 8 pages of theory in my training manual, but it was quite interesting all the same. Once again we took up ZK-EJZ, my favourite 152 (as well as everyone else). 😉
This time I did the majority of the radio calls on the ground, and I'll go through them here for interest sake.
Myself: Hamilton tower, Echo Juliet Zulu.
Tower: Echo Juliet Zulu, Hamilton tower.
Myself:Echo Juliet Zulu is at the club, request taxi for 30 minutes dual circuits, 2 hours 45 minutes fuel in reciept of Hotel (ATIS) 1008 (Pressure. Note thats the metric system version).
Tower:Echo Juliet Zulu, taxi to holding position Echo 1 for grass 25.
Myself:Echo 1 for grass 25, Echo Juliet Zulu.
--------
Myself:Echo Juliet Zulu is ready.
Tower:Echo Juliet Zulu cleared for takeoff, remain in the circuit (pattern).
Myself:Cleared for takeoff, remain in the circuit, Echo Juliet Zulu.
Finally we took off, and I rotated off the grass and lauched EJZ into the air. Greg flew the first circuit to demonstrate, and that was lucky due to the controller making a number of stuff ups in the circuit. As soon as we turned downwind she requested us to make a right hand orbit, as an Air New Zealand Link Beech 1900D was heading in our direction (well that wasn't really our fault). It was heading for Auckland, where CheekyTrolly lives.😉 Once we turned onto finals for the grass, Greg gave me the controls so I could have a go at the landing, which didn't turn out to bad. Instead of doing a touch and go we were to backtrack along the runway and takeoff again, as a touch and go is fairly high demanding on a learner pilot. The annoying thing about backtracking is you have to turn round on the runway 180 degrees, and taxi all the way back to the threshold (600m :roll🙂which took quite a long time.
Now that we were back at the threshold I finally got to take the controls for the entire circuit, and my first attempt at the circuit wasn't too bad, although I kept turning past my point of reference that I was turning onto when changing from downwind to base legs etc. During the circuit we were forced to change to tarmac 36 (what the heck for I have no idea, most planes were already in the 36 circuit :wall🙂 which annoyed me a bit. Due to high traffic in the circuit ATC decided we would have to do a touch and go, which I was pleased about as I wouldn't be wasting money backtracking.
Turning onto finals we noticed that there were two aircraft sitting on the RWY threshold not looking like they were going anywhere, one sitting behind the other, so we were told to 'go around'. 😂
My approach wasn't exactly spectacular, and it didn't look like much of a straight landing but funnily enough we touched down bang on the centre line (must have been a fluke) 😀. I then brought the flaps back up to the take off setting of 10 degrees, and applied full power for the take off. I still have a slight problem of judging the climb out attitude, but should correct itself with the 5 or 6 touch and goes we will be doing each lesson in the near future.
Unless my memory has failed me I dont think anything out of the ordinary occured that circuit, and we touched back down on 18 for a full stop landing (minding the RWY extension workers just in front of the threshold), and back to the club.
Overall a very intense lesson, the circuit doesn't look very high demanding, but trust me on this one, it is. Not much of time to enjoy the scenery, but still alot of fun.
Lesson Highlight Experiencing one full stop landing, one touch and go landing, one full stop and back track landing, 3 takeoffs, 1 right hand orbit to avoid the Air NZ 1900D, 1 missed approach, and flying the circuits in general - all in just 3 circuits!
Next lesson will be Circuits 1, and we'll probably get through about 5 or 6 circuits depending on how busy the airport is, lets hope not as busy as this lesson! I aplogise if this lesson report doesn't make sense or is all mixed up, I've had to edit its so many times before posting its not funny. 😂
Flying time: 0.8 hrs
Total flying time 6.6 hrs
Until next Saturday (13th May),
Thanks for reading! 😀
👍
Thanks for the report Jared 😉
pilotwannabe wrote:
👍
Thanks for the report Jared 😉
Glad to be at your service PW! 😉
Good stuff - keep the stories coming 😎
I assume that in 10 years you will be flying me across the Atlantic in a 777 or something. I'd trust you, you seem to be getting the hang of this.
Hey guys,
Finished lesson number 11 a couple of hours ago, on quite a cold, miserable and wet Autumn (Fall) day, which was Circuits No. 1. Flight time was a pretty handy 0.8 hours, and the drizzling rain made visibility quite difficult, bringing it down to just 20km. We were operating on the grass 25L circuit, which is fine on sunny days but when its rainy and wet the runway becomes quite difficult to see and judge. Aircraft was Cessna 152 ZK-FLB, which actually belongs to the Waitomo Aero Club, however I believe they have given it to us on long-term lease. Anyway, we may as well get started, so enjoy my report.
Unlike previous lessons, circuits only require one briefing, which took place during my last one, Circuit Introduction, so we simply flew, which was nice for a change! As per usual I pre-flighted the aircraft as Dave (my instructor) was still out flying with another student, however I was soon rudely interrupted half way through by a sudden downpour, luckily the aircraft provides a considerable amount of shelter in the form of wings and the cabin. FLB passed my inspection and upon Dave's return we hopped into the aircraft and taxied out for departure.
Take off for Circuit No. 1 wasn't too bad, although I was a bit slow rotating and it took a while for us to get into the air. Dave manned ATC for the first circuit while I concentrated on flying, and we were soon downwind for the grass. I'm still shocking at turning out onto my reference points, but I improved as the lesson went on. Rolling out of the turn onto finals was slightly underestimated by me, you have to apply a suprisingly amount of force to roll the aircraft out of a turn. My landing was pretty average, I definitely need to pull back harder and faster when flaring the aircraft on touchdown. We were doing a touch and go so we applied full power after raising the flaps from full 30 to 10 degrees, and applied some right rudder to keep us pointing straight on the runway.
Circuit number 2 was a right hand one, as there was an Air NZ ATR 72 on long finals for the tarmac which we would have interferred with. Dave flew quite a bit of this circuit as we had to make a shortened downwind leg to avoid the ATR. Once on short finals Dave gave me the controls again, this time I flared better and landed on the main gear. Once again full power was applied and we took off for circuit Number 3.
This time Dave said that I would fly the circuit by myself with little imput from him, and didn't do to badly apart from forgetting the carb heat and raising the nose when reducing power back to 1600 RPM. My approach was looking prettt good, until I lost it and noticed we wern't coming down quick enough, so I took the the initiative of completing a go around as a safe option, which is good for practice anyway.
Lesson number 4 definitely wasn't the best of the day, as we had to considerably lengthen our upwind leg to avoid a large cloud that drifted out way (thanks very much Mr. cloud, excellent timing ). We were soon back on short finals for the grass, this time it was quite a good approach and I was very pleased with it. Unfortunately that marked the end of the lesson, which was one of my most enjoyable yet, thats for sure.
Like I mentioned in the last lesson, the circuit is not at all what it looks, it is certainly not a place for mucking round and minding your own business, communication is essential, especially with other GA and Commercial craft sharing the airport with you. It gets my vote for most intense part of the flight, by far.
Once again, thanks for reading, I greatly appreciate and hope it encourages other members and guests here to go out and explore one of the greatest hobbies / recreational activities on the planet: Aviation!!
Flying time: 0.8 hrs
Total flying time: 7.4 hrs
Thanks again,
Jarred. 😀
still very interesting to read!!
😎
Well done Jared_01,
You'll be in the 747 in no time 😉
Very interesting reading Jarred, keep up the good work 😉
Hey everyone,
Been a while since my last lesson report simply because I couldn't be bothered writing it. The problems with circuit lessons is the fact that there is nothing to write about, as you're just practicing and not really learning alot of new things.
My instructor for the lesson was Greg, and we taxiied EOQ out to grass 18 for 30 minutes dual circuits.
It wasn't the greatest of lessons, I kept making little mistakes like underestimating the turn onto finals, and flaring too fast so we floated down the runway. Apart from that, the other parts of the circuit wern't too bad, I just need to keep practicing.
Next lesson is Saturday the 17th June.
Flying time: 0.8 hrs
Total flying time 8.2 hrs
Until next time,
thanks for reading. 👍
If the question and answers provided above do not answer your specific question - why not ask a new question of your own? Our community and flight simulator experts will provided a dedicated and unique answer to your flight sim question. And, you don't even need to register to post your question!
Be sure to search for your question from existing posted questions before asking a new question as your question may already exist from another user. If you're sure your question is unique and hasn't been asked before, consider asking a new question.
Flight Sim Questions that are closely related to this...