If you follow the guides to the letter, then there really isn't a way you can go too far wrong. It sounds like you are either:
1) Engaging the APP button too far from the ILS. It should be around 8-10nm.
2) Not switching the GPS/NAV switch to NAV before you engage APP.
Follow this carefully:
1) You will receive a long approach clearence (if you are flying IFR and have filed a flightplan, that is). The clearence will tell you what approach you are taking, the QNH/QFE, and the distance you are from the airport. You need to write down the airport dictated in that clearence (if you don't already know it) and the runway and type of approach, i.e. ILS (type of approach) 29R (the runway).
2) You then need to go to your Map which is the little star like icon on the panel or go to the "World" menu at the top and click "Map".
You should see a purple or white line towards your destination airport from where you are. Follow this line to your airport, and double click on a runway at that airport in the map, (You might need to do this more than once, as sometimes it thinks your trying to change the route).
3) From the map, there should be a list of runways with a line of information after them. Find the runway that you received in your IFR clearence in point 1. Write down the runway heading i.e. 292 degrees, and the NAV frequency for the ILS of that runway, as well as the Airport Elevation which can be found in that same box above the list of runways (expressed as Elav. or something similar).
4) After you have all of that information written down, close the map and open your Radio Stack. Open up the radio stack and type the frequency you wrote down, into NAV1 and make sure it is in the primary position, meaning it is on the left as opposed to the right of the two dials. This can be done by pressing the <---> button in the middle of them. At the bottom of the radio stack, there should be a row of clickable buttons, namely COM1, COM2, BOTH, NAV1, NAV2, ADF, DME etc. Click the NAV1 button as to illuminate the light.
5) Close the radio stack, and enter the runway heading you wrote down from the map, into the Autopilot panel (MCP), under the CRS section (Course). **In some aircraft such as the 747, the CRS selector is found on the Horizontal Situation Indicator (HSI) which is the compass on the panel, usually found under the Attitude Indicator.**
---You now have the approach set up, and should be flying towards your airport whilst descending. At about 30nm out, you should be around 9000 feet, descending at around 1500-1800 fpm with a speed of roughly 240 KIAS; aiming to reach 2800 feet by 15nm from the airport---
6) Once you reach the height and distance of 2800 feet from 15nm out, you will now be hearing the ILS Morse code identifier and you should be roughly on course, according to the HSI (but only if you have remembered to type the ILS course into the course selector). You will soon enter the glideslope pattern where you will need to slow down considerably to stay on it, about 180 MAXIMUM in a jet.
7) At this point, or around 10nm out, at the same altitude, you should receive a clearence to land from ATC.
-For Autopilot to control the descent on the ILS = Number 8
-To hand fly visually on the ILS = Number 12
--> For Autopilot to descend on the ILS...
😎 Switch the GPS / NAV switch to NAV instead of GPS.
9) Make sure you have Autopilot on, your speed is at or below 180 KIAS, and you are at a height of 2800 feet. Press the APP button at around 10 nm out, and the aircraft will follow its path down vertically and laterally until you get to 500 feet AGL.
10) You will have to control flaps, speed and gear on this approach. At 500 feet AGL, you must disengage the Autopilot and hand fly the last 500 feet.
11) Once you land, slow down and taxi from the runway.
--> For visual landing on the ILS...
12) On the attitude indicator on the right and bottom side or similarly on the HSI, white indicator lines shall appear, with a pink triangle on both the vertical and horizontal set of lines. The big line in the middle is the centre of the approach and is the correct glideslope. If you are too high, the triangle on the vertical axis will be below the middle line and vice versa. If you are too far to the left, the line will appear to the right of the middle bigger line, indicating that you should turn to the right until it centers. To put it simply, fly towards the lines as to centre them.
13) Do this all the way down to the runway threshold; making small movements on the control surfaces to center the arrows / lines on the HSI or attitude indicator. You can use the AP to control the speed if you find this easier. At the same time, you need to control flaps and gear etc.
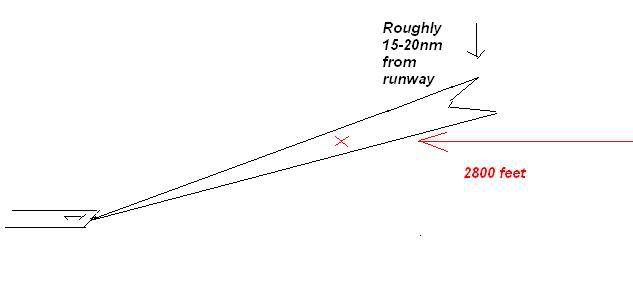
I've shown what is meant by intercepting from below here:
The red line is the aircrafts track toward the ILS glideslope. As you can see, the beam of the ILS extends to around 15-20nm. When the aircraft flies along the red line to the red 'X' they are engaged in the glideslope beam and the vertical indicator will show that the aircraft is centered. From this point, the aircraft needs to start descending; below 2800 feet to stay in the center of the 2 lines, which get closer and closer together until the threshold of runway 1.
If you were to try and intercept the glideslope from above then you could be too high and miss the glideslope completely and have to dive to lose altitude to get centered on the ILS. If you intercept from below, (as opposed to roughly where the black arrow is) then you are guaranteed to 'hit' the ILS beam so it centers itself for you once you get to point 'X'. I hope you understand this vague explanation.

 8 Answers
 Jump to latest

 Chief Captain